MOD Info
Full Game
SimpleRockets 2 is a full 3D space exploration game where you can build rockets, planes, rovers or anything you can imagine and explore highly detailed 3D planets, perfect for players who love space. By arranging parts to build rockets, you can build rockets from basic to complex levels, such as planes, mobile stations, satellites, robots and machinery, everything can be infinitely creative.
SimpleRockets 2 Highlights
1. Players can make a variety of realistic weapons such as game fighters and rockets, and can also make more advanced equipment.
2. The game content is creative. Players will assemble according to the parts and props they have in the game.
3. This is a very casual game, using different parts to assemble a rocket that can be launched.
4. The game content full of imagination and creativity brings more diverse gameplay and new ideas.
SimpleRockets 2 Features
1. A fully 3D rocket designer that allows the construction of anything from basic rockets to very complex multi-stage rockets, aircraft, rovers, satellites, robotic machinery, etc.
2. Design custom rocket engines and jet engines.
3. Realistic rocket physics and orbital mechanics.
4. More than 30 parts, including fairings, retractable solar panels, rover wheels, engines, etc.
5. Highly procedural parts that can be resized and reshaped into infinite combinations, such as resizable fuel tanks and cargo compartments.
SimpleRockets 2 Strategy
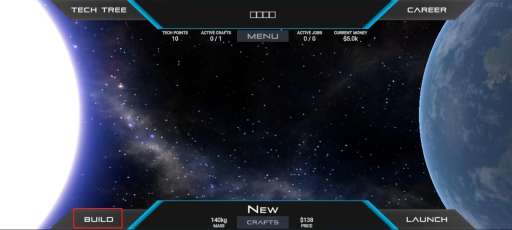
1. First, after downloading and installing the game on this site, open it and click [build] in the lower left corner to build.
2. There are many tools on the left for players to choose from.
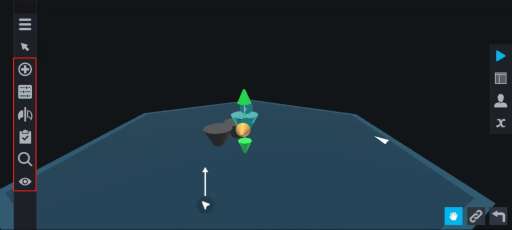
3. Introduce from left to right.
Left (from top to bottom)
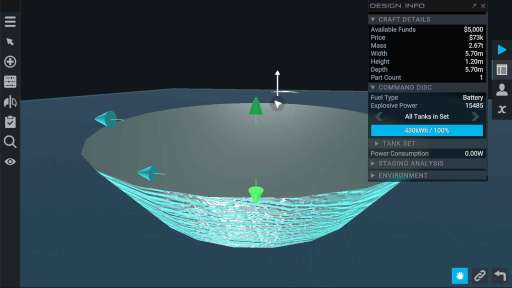
Menu (including download rocket: used to download rockets from the official website; new rocket: rebuild aircraft or rocket; load rocket: load the rocket you have saved; save rocket: save the aircraft or rocket built on the current page; gear icon: it is the setting, please refer to the setting in the menu above, this is the same Page, upload icon: a channel for uploading your own works to the official website, camera icon: a channel for taking photos of your own works; performance: performance analysis table of rockets or aircraft, editing program: editing automatic execution system), moving parts (refer to basic tutorial), parts table (refer to basic tutorial and advanced tutorial), part characteristics (refer to the advanced part settings page below), launch pad (refer to basic tutorial), symmetry (refer to basic tutorial), search parts (display the parts currently used, which is convenient for precise positioning of smaller parts), view options (check whether the center of gravity position of the spacecraft or aircraft is accurate).
Upper right: execute launch
4. Introduction from left to right
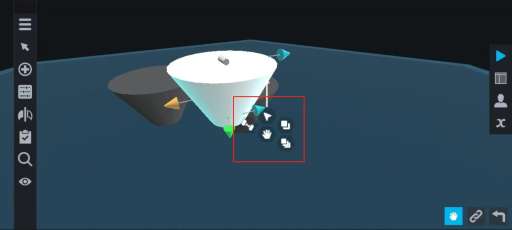
Part operation buttons: (from left to right, from top to bottom) part separation, part selection, part movement, single part copy, combined part copy.
Part combination button: glue parts together. For example: when saving new parts, glued parts are easy to save, and unbonded parts are easy to separate when moved.
Back to previous step button: This button can be used to return to the previous step when the construction is wrong.
5. Parts advanced settings page
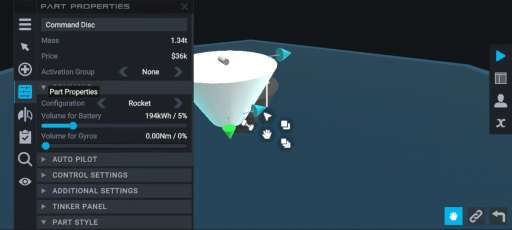
A. Parts data sheet: Part name (editable), Part mass (kg), Part price (useless, just showing off), Activation group (settings for special parts that need to be activated, and finally activated through the part activation group (such as: solar panels), sometimes slider 1 and slider 2 are required to assist in execution (such as: robotic arms))
B. RESIZABLE PART (adjustable part): Exclusive settings page for different parts, which can basically be set (such as: fairing throwing speed, cargo compartment opening speed or opening angle,
C. ADVANCED PART SETTINGS (advanced part settings): mainly set Fuel line (fuel pipeline: used to connect fuel pipelines between parts)
D. TINKER PANEL (modification panel): mainly includes Part Scale (size scale: adjust part size), Mass Scale (mass scale: adjust part mass), Heat Shield (heat shield: adjust insulation capacity), Max Temperature (maximum temperature: the highest temperature that can be tolerated), Drag Scale (drag scale: basically don't care, not very useful).
E. PART STYLE (Part Style): mainly includes Style (Style: adjust the basic style of the part) and Texture (Texture: adjust the surface pattern of the part).
F. ROTATOR INPUT (rotator input): click the English corresponding to input and change it to AG1. The main thing is to merge the activation button. In the past, some parts required the auxiliary activation of the part activation group and slider 1 and slider 2. After setting it to AG1, only the part activation group is needed to activate, which simplifies the cumbersome procedures.
Similar Apps
